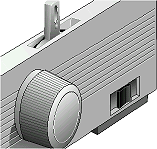
First, review the parts of the Okidata 320/321 printer. They are illustrated below.

Part Names
1.Paper Guides: Keep the paper straight when feeding into the printer
2.Paper Separator: Feeds the paper into the printer correctly
3.Paper Lever: Sets feed type. Paper can be fed into the printer from the rear, bottom, or top. Usually, this lever is set to TOP.
4.Power Switch: Turns printer on and off.
5.Platen Knob: Turns the platen (cylinder) that pulls the paper throught the printer.
6.Control Panel: Contains the control buttons for the printer to change printer settings.
7.Acoustic Cover: Noise damper to help keep things quiet.
8.Access Cover: Keeps foreign objects from entering into the printer and the path of the print head.
Also, review the Front Panel buttons. They are illustrated below:

Button Names
1.SEL: Glows when the printer is selected and ready to print documents. Flashes when printer is in Print Suppress Mode. Not lit when printer is deselected and cannot print documents.
2.QUIET: Glows when printer is in Quite Mode.
3.HSD/UTL/NLQ/SSD: Indicates selected print quality. This is usually determined automatically by the software and need not be adjusted.
4.POWER: Glows when printer is turned on.
5.ALARM: Glows when an error occurs. Errors may occur for several reasons, including:
oout of paper (no other lights are blinking)
opaper jam (if 15 CPI light is also blinking)
opaper lever is set to the wrong position (if 10 CPI light is also blinking)
ogeneral printer error (if ALARM is blinking). Turn the printer off, wait 30 seconds, and then turn the printer on again. If this does not correct the error, contact your printer service dealer.
6.10/12/15/17/20/PROP: Glowing light indicates the selected character pitch. This is usually determined automatically by the software and need not be adjusted.
Setting the Alignment on the Printer
In order for the Lot Wizard to print forms, all forms must be inserted the same way into the printer. This means that the left edge of the form must line up in the same spot every time a form is loaded into the printer. You can ensure this by adjusting some of your printer features.
First, make sure there is no continuous-form paper in the printer. If there is continuous-form paper in the printer, press the PARK button on the Control Panel to remove it before loading your documents.
Next, ensure the printer is ready to accept paper from the top. To do this, make sure the printer is turned on and is set to Deselected. The printer is deselected when the SEL light is not lit. This is usually the case when there is no paper in the printer.
Move the paper lever on the side of the printer to the position marked "TOP." This sets the printer to accept paper from the top of the printer.
Slide the left paper guide on the paper separator so that there is approximately a 1/8-inch gap showing as pictured below:

Feeding a Form into the Printer
Insert your form into the printer. When inserting the form, make sure it is inserted top-first and face-down. The paper will need to curl back around the platen and will end up coming out top-first and face-up. Also, make sure that the left edge of the form is against the left paper guide.

Aligning the Form for Printing
After selecting a form to print within Lot Wizard, a message will be displayed describing where on the form you should set your printer alignment. An example is shown below. Click OK to begin the printing. If the printing did not begin exactly in the right spot, you may need to slightly adjust the vertical starting position by gently rotating the platen knob and move the form up or down a little.

If the printer the top part of a document correctly but slowly "drifts" high or low from the correct printing location, each Lot Wizard form allows for printer fine adjustments.